A damage profile tutorial for CFS. Revision 3
Changes in rev. 2:
Various spelling errors. Info on online damage dice.
Changes in rev. 3: Errors corrected, tips and tricks section included.
Scope: This tutorial is aimed at the advanced user; I assume you know what a .dp file is, and I assume you are familiar with Windows and various general utilities, like Notepad. The tutorial has two parts; first the DP file is explained in general terms, next the use of the Damedit program is explained in detail.
Disclaimer: The information in this tutorial represents the best of my knowledge; I take no responsibility for any errors or the effects thereof. When editing DP files, pay attention to the fact that a DP file may be the intellectual or commercial property of some party; you are solely responsible for any infringement of copyright of any other rights of the owner if you edit a DP file.
First, lets look at the various entries of a DP file; find some DP file and open it with notepad (all the examples in the first part below come from the stock Fw190a.dp).
Positional definitions
Throughout this tutorial positional coordinates are used in the following way:
X axis: Horizontal sideways; the axis of the wings, negative numbers left.
Y axis: Vertical, negative numbers down.
Z axis: Horizontal longitudal axis; the axis of the
fuselage, negative numbers rearwards.
Passive or defensive functions
Boxes
The various physical parts of the aircraft are defined in the box entries. They look like this:
[BOXES]
box.0=nose,-0.57,-0.32,1.05,0.57,0.95,2.84
box.1=fuselage,-0.56,-0.32,-1.74,0.56,1.39,1.05
etc. ....
The parameters (separated by commas) are as follows:
Systems
The various functional parts of the aircraft are defined in the system entries. They look like this:
[SYSTEMS]
system.0=%system_name.0%,700,0
system.1=%system_name.1%,400,2
system.2=%system_name.2%,500,3
system.3=%system_name.3%,200,7
system.4=%system_name.4%,250,-1
system.5=%system_name.5%,50,9
etc. ......
The parameters (separated by commas) are as follows:
Boxmaps
The boxmaps combine boxes and systems so that the physical position of the systems are defined. They look like this:
[BOXMAPS.0]
; Box = nose
boxmap.0=40,0
boxmap.1=10,2
boxmap.2=35,3
boxmap.3=5,7
boxmap.4=10,-2
First line defines the number of the boxmap, which corresponds
to the box with the same number, here no. 0, which is the nose.
Next line is a remark for the benefit of the user, which tells us the name of the box,
"nose".
Then come the actual boxmap entries for that box, numbered consecutively; the numbers are not really used for anything, but I assume something might get messed up if they are not in the right order. The next parameter (40 in boxmap 0) is the percentage of chance that a given system will be hit if the box is hit. The final parameter is the system tag (Note: Not the number). In boxmap 0 here, it is the system 0, which is the nose structure.
Other system functions mapped to the nose box in this DP
are:
2, oil reservoir
3, engine
7, hydraulics reservoir
-2, machine guns
The boxmaps for each box may add up to, and must not exceed
100%.
Each system tag may be mapped to several boxes, eg. the rudder control cable will
probably be mapped to cockpit, fuselage, tail (forward), and tail (rear).
So far so good ---
We now have:
Now we need to define what happens when a system is hit. For this we have the
Effects
The effects entries look like this:
[EFFECTS.0]
; System = Nose Structure
effect.0=100,BREAK,,
[EFFECTS.1]
; System = Oil Reservoir
effect.0=10,LEAK,2,1
effect.1=20,LEAK,2,2
effect.2=30,LEAK,2,3
effect.3=100,BREAK,,
[EFFECTS.2]
; System = Engine
effect.0=10,LEAK,2,1
effect.1=20,LEAK,2,2
effect.2=30,LEAK,2,3
effect.3=100,BREAK,,
[EFFECTS.4]
; System = Cockpit
effect.0=10,DAMAGE,2,1
effect.1=20,DAMAGE,2,2
effect.2=30,DAMAGE,2,3
effect.3=100,BREAK,,
[EFFECTS.6]
; System = Fuel Tank
effect.0=10,LEAK,3,1
effect.1=20,LEAK,3,2
effect.2=30,LEAK,3,3
effect.3=100,BOMB,1,
Let's look at the first group:
The header tells us it pertains to system number 0, which is the nose structure. For the benefit of the user, there is a remark line that mentions its name. Notice that we are talking about the system number, not the system tag.
There is only one effect, it is numbered 0 and it says that when the system suffers 100% damage (all the hit points are spent), the system will BREAK; in this case the aricraft will break up structurally. "BREAK" is one of the possible keywords that can be assigned to an effect entry.
Next group, the one for system number 2, the oil reservoir, is more complex:
Here we have several effects reflecting increasing amounts of damage. At 20%, the system will LEAK (another keyword). The next parameters determine the visual effects of this; first 2 which means black smoke, and the severity, 1 which means puffs.
The next two effects define that at 20% damage, the black smoke will increase to severity 2, which means intermittent. At 30% damage the smoke will be continous.
Finally, at 100% damage, the system will BREAK, and as this system has the system tag 2, which is internally mapped to engine functions, the engine will run rough and overheat.
For system number 2, the engine, the damages run like above, but this system has the system tag 3, which maps directly to engine 1. So the engine will run rough, loose more and more power and finally quit.
System number 4, the cockpit (in reality the pilot) shows a new keyword, DAMAGE, here there is no smoke, but function gets increasingly impaired in some way depending on function, and finally breaks. Here the pilot looses all control.
Finally, in system number 6, we introduce the keyword BOMB. When the fuel tank is totally wrecked, the plane simply blows up. The size of the explosion is determined by the last parameter; it can be 1 or 2, for a normal and a big explosion, respectively.
This almost sums up the defensive part of the DP functions, all we need to add are the
System strings
They are normally found at the bottom of the DP file and they look like this:
[STRINGS]
"system_name.0"=Nose Structure
"system_name.1"=Oil Reservoir
"system_name.2"=Engine
"system_name.3"=Hydraulics Reservoir
"system_name.5"=Radio
"system_name.6"=Fuel Tank
"system_name.7"=Fuselage Structure
All they do is assign a string to each system number. This string is displayed on your screen when the system takes damage, and it can contain any words you like. When you get French damage messages in some Bruno Duffort planes, it is because he entered French strings here. Some fun planes (outhouses, etc.) also have various funny system strings.
Offensive functions
Most warbirds carry offensive weapons. In fact, they are already covered in part by the description above, because some of the systems that can be hit and take damage or fail are the guns (and rockets and bombs), but we want them to shoot too. Weapons are defined in two levels; the top level is the
Gunstation
The gunstation defines a weapon or group of weapons of the same type. They are normally placed close to each other and the AI gunners fire and aim a gunstation as a whole. Most of the characteristics of the weapon are defined in the gunstation entry. The gunstation entry looks like this:
gunstation.0=0,-2,1,0.07,839,2,0.01,500,3,40,1d1*12,0,0.048828125,1.013,-0.11965,0,0,0,0,0,0,1.5
1
2 3 4 5 6
7 8 9 10 11 12 13
14 15
161718192021 22
A lot of parameters! Let's examine them one by one (red numbers below the line):
But we are not quite ready to shoot yet! For each gunstation, there must be at least one
Gun
The gun definitions for the gunstation above look like this:
[guns.0]
gun.0=475,-0.161,0.876,0,0,0,1,475
gun.1=475,0.161,0.876,0,0,0,1,475
1 2 3
4 5 6 7 8 9
The header tells us that this gun group belongs to gunstation number 0.
Parameters (red numbers below the line):
Finally
This almost concludes the description of the .dp format. Only one thing more:
Extras
The format of extras is:
[EXTRA.0]
extra_type=1
smoke_type=0
smoke_color=0
smoke_xoffset=0.0434783
smoke_yoffset=0
smoke_zoffset=-6.78261
The extras are used to add smoke or fire effects. In stock CFS, you will see it on ground objects (ground objects also use damage profiles), but you could add it to planes as well.
Extra type: I only know of type 1, which is smoke and fire. Do give me a call if you know or discover more on this subject.
Smoke type can be:
1=Timed (runs for a certain time), presumably there must be
a parameter smoke_time, but I'm not sure
2=Repeating, long puffs
3=Constant
4=Random, random puffs
Smoke color can be:
0=Fire
1=White
2=Black
3=Red
4=Green
5=Blue
The offsets, of course, determine the point the smoke emanates from, relative to the center of the plane. Generally, extras have only decorative effect, but if a fire is defined at some part of the airplane, you will actually get damage messages, like "Fire is burning your tail (rear)", and presumably the relevant system suffers damage.
How CFS uses the damage profile
So, what happens when you are playing the game? Suppose you are in a dogfight and are aiming at another plane and pull the trigger.
Now, several things happen:
If your aim is bad, CFS will trace the bullets for the time specified in the time alive parameter in the gunstation entry, and that will be that. If however, some of your bullets cross the position of your target, some things will happen. Let us suppose the trajectory of one bullet intercepts the wing box of the target:
Note the last point: The bullet flies on! For better realism, the bullet should be stopped, deflected, or slowed down, but that does not happen. This means the same bullet could pass several boxes and damage several systems, it can even hit more than one plane. It also means that you cant simulate the effect of amour plates.
What is a CDP file?
If you look into an aircraft folder, you will notice a file with the extension .CDP. This is CFS' working copy of the DP file; the DP is a text file and has to be compiled for easy access by the program. The result of this compilation is placed in the CDP file, and not only that, but as long as the DP is not newer than the CDP, CFS will use the information from there. This has some side-effects:
If at all in doubt about the validity if a CDP file, simply delete it. CFS will create a new one.
What is the default.dp?
The default.dp is a DP file that resides in the Aircraft folder and is used by CFS whenever it encounters a plane that does not have a DP file. It is very similar to the Spitfire mk IX. If you download a plane made for FS98 and copy it to CFS, it will fly with the default.dp. This can cause trouble because for FS98, a plane should be designed loaded, that is, ammo weight should be added to its weight. In CFS, however, planes are designed without ammo load, and then the ammo weight is added based on the DP. So an imported plane may end up with douple ammo weight. Or, it may be a plane that cannot lift the weight of the default load-out. I remember the first WW1 planes I imported, they flew like bricks untill I thought of giving them a Camel DP.
What is a damage dice?
The hitting strength of each bullet is determined by the damage dice parameter in the gunstation entry. The damage dice consists of two parts:
1d1*23
The numerical part (shown green) is simply the number of hit points that the bullet will subtract from a system it hits (when weapon strength is set to medium), but this figure can be modified by a random factor provided by the first part. The 1d1 can be taken to mean one dice with one side, in other words, no random factor, the value 23 is used directly. A value of 1d36 (or 36d1) will mean that the initial value is multiplied by a random integer between 1 and 36. A value of 6d6 meand that the initial value is multiplied with 6 random numbers between 1 and 6; this gives the same range (1-36) as before, but the distribution is different. In the first example, the distribution is linear, all numbers are equally likely to occur, in the second example results will tend to center around a middle value (18*23). The damage dice can be any number, so a doomsday gun with 999d999*100000 can be defined which will take practically anything out in a single shot, however, in multiplay, only 8 bits of damage dice is transmitted, so the most powerful gun setting will be 255. The effect of the dice part here is not well known.
How do I define a cannon?
A cannon is just another gun with its parameters adjusted to macth the caracteristics of a cannon.
How do I define rockets?
The DP entries for rockets look like this:
gunstation.3=2,-4,4,0.00,0,0,0,0,0,0,1d1*3000,0,0,0,0,0,0,0,0,0,0,1440
gunstation.4=2,-6,4,0.00,0,0,0,0,0,0,1d1*3000,0,0,0,0,0,0,0,0,0,0,1440
[guns.3]
gun.0=3,-2,0,0,0,0,0,0
[guns.4]
gun.0=3,2,0,0,0,0,0,0
They look a lot like the gun entries, but only the parts shown in green have any importance. For the gunstation they are: The number, gun type (2), the system tags, the trigger, and the unit weight. And for the gun entry: The gunstation number, the gun number, the max and default ammo. The sytem tags determine right or left wing, and rockets are always fired from positions that are below the wing on a single-engine ww2 fighter. While the entry does contain a damage dice, it has no effect. The power of the explosion is always the same. The difference between impact and timed rockets is only in the trigger used to fire them.
How do I define bombs?
The dp entries for a bomb rack look like this:
gunstation.5=3,21,8,0.00,0,0,0,0,0,0,1d1*6000,0,0,0,0,0,0,0,0,0,0,2939.33333333333
[guns.5]
gun.0=3,0,0,0,0,0,0,0
Again, only the green parts make any difference. You cannot place the bomb bay anywhere else, and you cannot change the strenght of the bombs. People have been making 99999d99999*100000000 bombs, but CFS is no nuke territory.
How do I define a flak cannon?
While basically just another gun, flak is somewhat special. These are the entries for a forward-firing plane based flak cannon:
gunstation.2=4,-2,2,0.05,1100,2,0.01,50,5,30,1d1*20000,0,-0.956522,512,0,0,0,0,0,0,0,0.01
[guns.2]
gun.0=25,0.347826,-0.01,0,0,0,1,2,
The interesting parts are shown in green. First of all, gun type is 4; this denotes flak. This one has trigger 2, so it uses the secondary trigger. A big damage dice has been entered, but just like rockets and bombs, a flak burst has some fixed effect, regardless of the damage dice. Note the Z position: The flak burst occurs where the flash would be for other guns, so just turning normal guns into flak will kill you! Instead, this flak gun is placed 512 meters in front of the plane, so this is where the flak burst occurs. Finally, the ammo weight is set very low; you can imagine the effect any considerable weigh placed 512 meters on front of the plane would have on the flight characteristics!
Flak guns dont seem to work in multiplayer. The characteristics of flak guns, especially air-borne, are far from fully explored.
What is harmonizing?
On most warbirds, guns are placed some distance apart. Actually, if they are placed in the wings, they are several meters apart. So if they fired straight ahead, the bullet streams from the guns in the wings would fly on both sides of the aiming point, and this is not very effective! Thus guns must be adjusted to aim slightly inwards so that the bullet streams converge on a single point. The right distance of this point is a matter of taste and shooting style, and during WW2 pilots were soon allowed to chose their own harmonizing disance. In Damedit, there are two standard distances, 300 and 500 meters, and a user definable point.
How do I test Dp changes?
When you make changes to a DP file, you will usually want to try it out several times along the way. What you do is start CFS and go into free flight and select the plane. In your DP editor, save the plane. In Damedit, this is either done via the Save button on the main page or the Locate box button on the Boxes page. Testing usually involves looking for gunflashes. minimize the editor and press "Fly now" in CFS. You are now sitting on the runway. press c to go to external view and pan around the plane to get a good angle. Fire your guns an look for gunflashes. Now comes the sticky point: To make more changes, you must exit free flight, press <Esc>. Then go back to your editor and do your changes, REMEMBER to SAVE, then back to CFS, press Fly now, etc. etc. Two things are important: You must remember to save the new version of the DB (sounds obvious, but wait till you have looked in vain for a change to take effect ...), and you must go to the free flight menu to make CFS reload the DP.
Building a DP using Damedit
Basically you dont really need a special editor: Anything can be done in Notepad. For many things, Notepad is rather cumbersome, however, so several DP editors have been published. Of course I had to make my own; I call it Damedit. Damedit is better than the others in some respects, poorer in others. This following section covers the steps of building a DP from scratch using Damedit. Of course, you will rarely do that; most of the times it is much easier to take an existing DP and modify it. However, by starting from scratch, we are sure to cover all aspects.
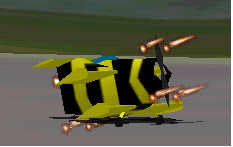
First we need a plane. Unless you build your own planes, what usually happens is that you download a plane made for FS98 and want to use it for CFS. So lets us import a plane; I have chosen the Bumble Bee for this example. The Bumble Bee is on Dave Middleton's site, but there are a few problems with the original versions: First of all it is made for FS5, so it needs converting, secondly it doesnt fly very well, actually I would say that it cant fly at all! This may reflect the original plane allright, but its not much fun! So here is a version that has been modified so it flies (it is still rather tricky, but it flies): DOWNLOAD.
Once you have downloaded and unzipped the file, you should have a plane titled "Bumble Bee testplane" in a folder called bbee. You can take it for a spin if you will; you will notice that it is somewhat sluggish, but well armed.
(If you dont want to go through all the steps below, the finished result is in the package, just rename the file bbee.test to bbee.dp)
If you havent already installed Damedit, do it now: DOWNLOAD.
Start Damedit; if it is not in full-screen, press <alt><enter>. You will be on the main page. Now:
Systems
Now we want to add some systems. Since this is just a test, we dont want to make it too complicated, so we'll just make a few systems:
Note that we put one system in with the BOMB effect. There is a bug in the way CFS handles severely damaged planes, probably the same bug that lets you make a too sharp turn and do a somersault without falling out of the sky; sometimes a crippled plane will do somersaults all over the sky without ever crashing. The chance of this happening is reduced much if we see to it that it will blow up if it gets a really severe beating.
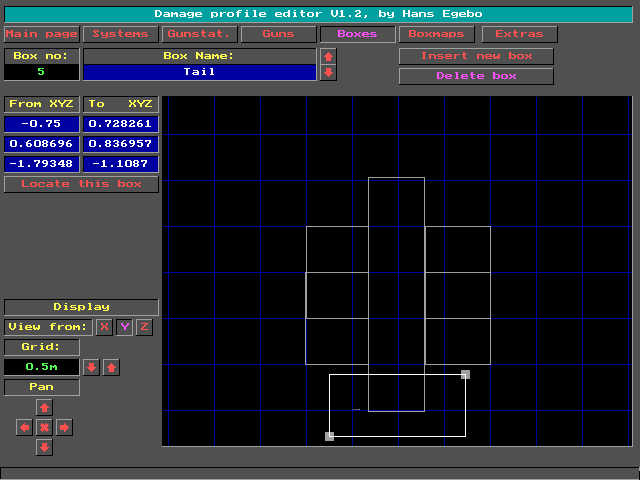
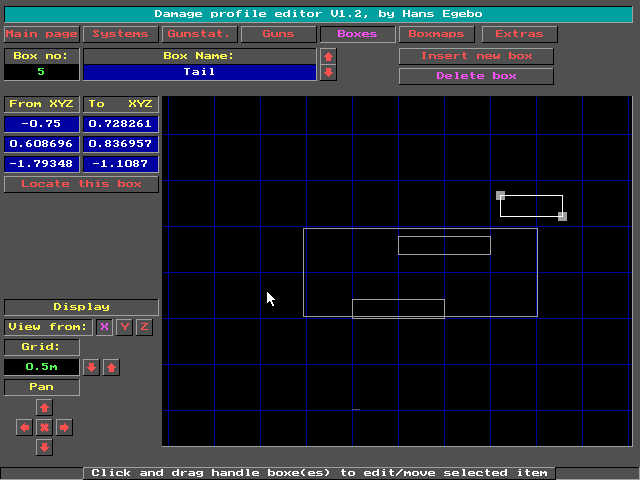
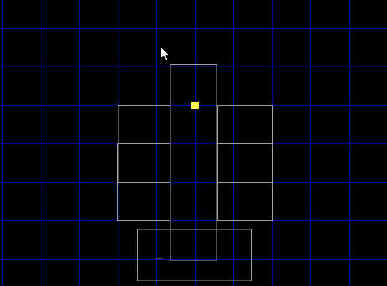
Boxes
Now for the boxes. Select the Boxes page in Damedit. The number of boxes is normally lower than the number of systems, but it does not have to be so; several systems can be mapped to one box and one system can be mapped to several boxes. We will try to do both here.
As it is common practice in CFS to let boxes be large enough to fully contain the particular part of the aircraft, this is just about perfect.
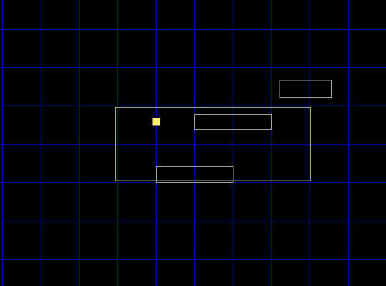
Top view
Side view
Boxmaps
Now we have systems and boxes, so now we need to make boxmaps to map all the systems to the appropriate boxes. In Damedit, boxmaps are listed as per system; this makes it difficult to keep track of how the percentages add up in the boxes, on the other hand, it is easy to keep track of where each system is mapped:
Select the boxmap page, and if neccessary, scroll to system no. 0, Fuselage. Of course, the fuselage structure must be mapped to the fuselage box, but the cockpit, fuel tank, machine guns, and engine also go here, so lets give the fuselage system 30%; enter 30 in the blue field to the right of the fuselage box.
Let's finish the fuselage box; scroll to the cockpit system and enter 20, and to the engine system and enter 20, and to the fuel tank and enter 20, and to the machine guns and enter 10, all in the fuselage box.
Above was a box with 5 systems mapped to it. Next we have two port wing boxes, but only one port wing system. Find the port wing system, nothing else goes in the wing boxes, so enter 100 at both the port_upper_wing box and the port_lower_wing box. Now, whenever a bullet hits a port wing box, the port wing system will take damage.
Do the equivalent for the Starboard wings.
Finally, map the tail system 100% in the tail box.
Time to save your work. Go to the main page and click save.
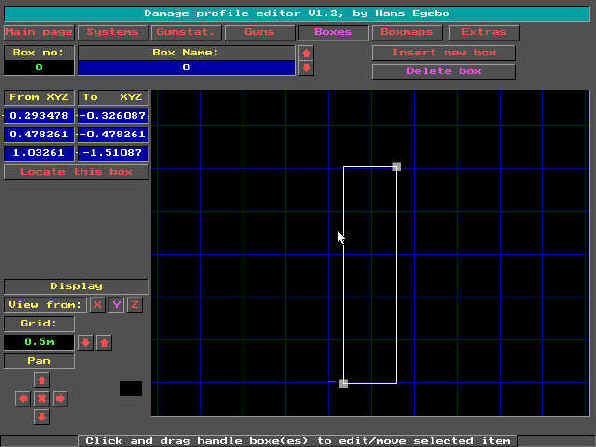
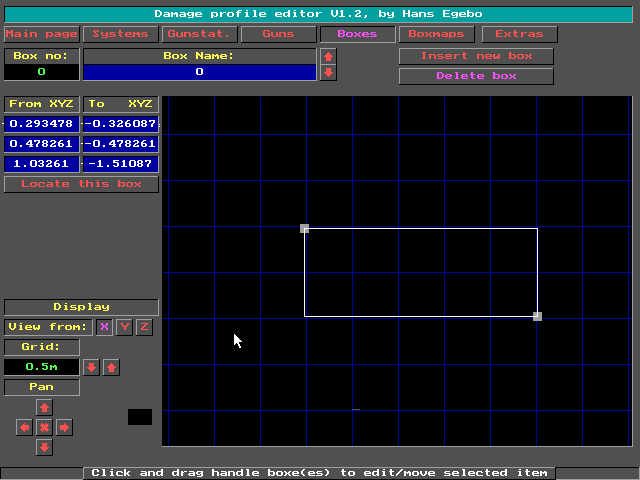
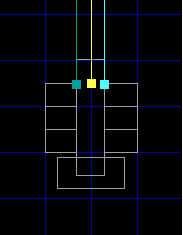
Gunstations
All we need now is to place some guns. Select the gunstation ("Gunstat.") page. You will see that a yellow square has appeared in the center of the display. We could leave it there, but for the exercise, drag it to a position as shown below:
Now we must enter the data for the gun; at the top left of the page is a set of fields for this (top left, you can scroll through your gunstations, but here we only have one).
Now guns
If you haven't already done it, maybe you should do a save now. Damedit is reasonably stable, but it has been known to crash now and then.
Then select the Guns page. Here you can work on the guns belonging to whatever gunstation you have selected on the gunstation page. Here, we only have no. 0. You can add up to 8 guns per gunstation (this is a Damedit limitation, CFS will allow more). The criteria for activating a gun is entering a value in the Max ammo field. Lets go:
Even though the Bumble Bee is a slow, fragile, and poorly
armed plane, you will find it is quite an adversary! Take it to quick combat and you will
find that the AI, although good marksmen, have great difficulty getting a bead on it
because it is so small. And if you want a real challenge, fly against a flock of them in
the Beehive mission: DOWNLOAD -
I wish you luck ![]() !
!
Tips and tricks
The invulnerable plane
If you will, you can make a plane that doesnt take damage when shot at. It will not be immortal, because crashes and collisions do not depend on the damage profile, but it will be impossible to shoot down. Needless to say, using such a plane in multiplayer is cheating, except when used as an observation plane. I have made such a small observation, or camara plane; I call it the cambird. You can download it here. It uses the bumble bee mdl, but a very agile .air. It is invulnerable, but unarmed. What makes it invulnerable? Very simple: No boxmaps! If no systems are mapped to boxes, the plane wont register hits. And since there are no hits to register, there is no reason to have a lot of systems and boxes, so the Dp is very simple:
[BOXES]
box.0=fuselage,-5,0,0,-4.9,0.1,0.1
[SYSTEMS]
system.0=%system_name.0%,100,18
[STRINGS]
"system_name.0"=Fuselage Structure
Well, thats all!
Hans Egebo